Segmentation#
In order to perform the core analysis, the windowing analysis, we first need to find the outline of the cell in all frames. Depending on the quality and type of acquisition this can be present different levels of complexity. A major complication is the requirement that the complete segmentation is nearly perfect to allow for a correct tracking. Three methods are currently available: a simple custom algorithm based on cell edge detection, a generalistic machine learning solution called Cellpose, and finally an Ilastik-based solution. They are all implemented in the segmentation module.
Custom segmentation#
In some cases e.g. with very bright and constant signal, it is possible to easily segment cells with standard approaches based on filtering, thresholding etc. Such an algorithm based on filtering with the Farid edge finder is currently available. Additional algorithms can easily be added to the software.
To use this solution, either select it in the user interface or adjust the param.seg_algo = "farid".
Cellpose segmentation#
Cellpose is a generalistic deep learning based algorithm to segment a vast choice of cells and nuclei in microscopy images. Generalistic means that is has been pre-trained on a large and varied dataset and doesn’t need re-training. The only requirement is to provide a diameter estimate of cells in a given experiment. Of all methods it is by far the slowest but shows excellent results even in complex situation e.g. with touching cells. Beware that it tends to smooth the edges of the cell, so it is not very appropriate to use if you are interested in finer details at the edges.
To use this solution, either select it in the user interface or adjust the param.seg_algo = "cellpose". Don’t forget to also set the cell diameter e.g. param.diameter = 60 in pixel units.
Ilastik segmentation#
The safest way to achieve good segmentation is to keep some level of manual control over it. This is offered by ilastik, a machine learning based solution which learns from manual annotations. The main advantage of this solution is that it allows you to verify that segmentation is accurate, in particular if there are effects like bleaching towards the end of the acquisition. Here we use the simplest workflow for pixel classification (you can find many tutorials online, starting on the Ilastik web site).
Data format#
You will need to add all frames of a given channel to the ilastik project. If your data are not in the appropriate format (e.g. ND2 files), first convert them (via standard solutions or custom ones like the solution provided in this package to convert ND2 files to H5).
Create project and annotate#
Create a pixel classification project and add all your files to be segmented to the project. Make sure the format is tyx (or tyxc) and not cyx or zyx by double clicking on your dataset and fixing the dimensions if necessary. Follow the standard ilastik pixel classification workflow with two labels: use the first label for cell segmentation and the second label for backhround. Make sure that the segmentation provides well-segmented cell(s) by browsing through the data and turning the live segmentation ON (disable it when moving across frames as otherwise Ilastik will segment all traversed images).
Export#
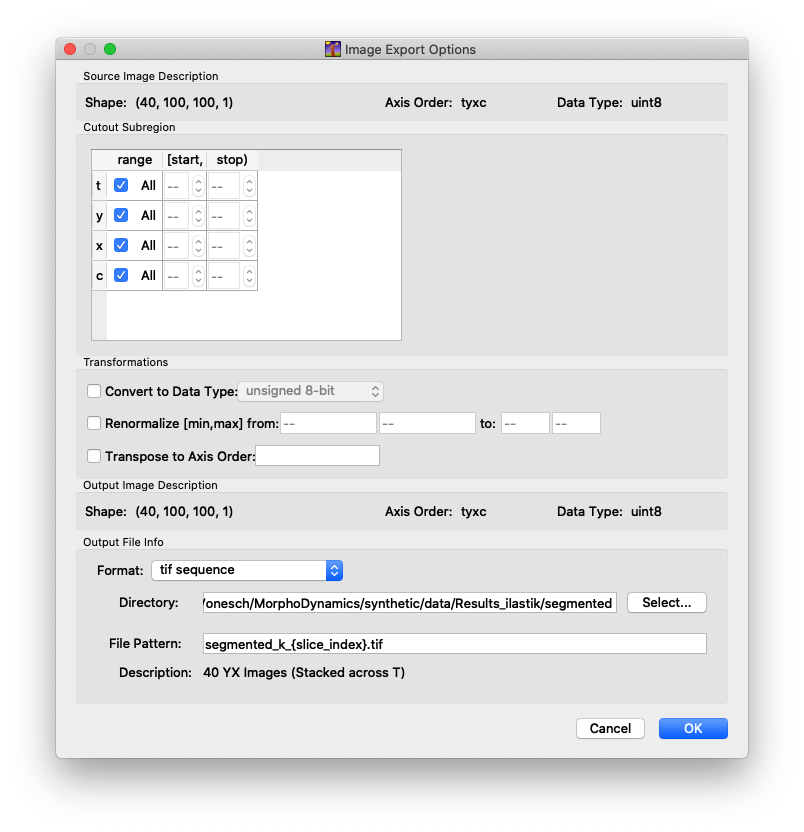
Once you are satisfied with the segmentation, you can run the complete segmentation over all frames. Go to the “Prediction Export” tab, and select “Simple Segmentation” as Source. Then click on “Choose Export Image Settings…”. You can leave most defaults as they are but adjust (see screen capture below):
Format: tif sequence
Directory: create and select a directory where to save the segmentation (e.g.
Ilastiksegmentation)File Pattern: segmented_k_{slice_index}.tif

Fig. 1 Export settings for Ilastik.#
Using in Morphodynamics#
If you want to use the Ilastik segmentation when analyzing your data, select the ilastik option in the User Interface or set param.seg_algo = "ilastik". With that setting the segmentation part is automatically skipped and masks recovered from the ilastik output.
